Chapter 10
Exception handling, logging, and other important things
Exception handling is another of these "important topics" where some developers may have a different opinion about how important it is. There may be even some experienced developers who might argue that the best exception handling is writing code that does not produce errors and if there is one, fix it and ship a new version without that error. For me, it's not that simple because there are many situations where an error is caused by situations developers have no control over like a dropped network connection or an unaccessible file share or something else. I won't discuss the pros and cons of exception handling in this chapter. If you are not sure what the "best practices" are, or if you like to read different opinions of experienced developers, there is of course a lengthy thread on Stackoverflow.com that is worth reading, for example, https://stackoverflow.com/questions/4506369/when-and-how-should-i-use-exception-handling.
This chapter not only explains how exception handling is done in X#, but it also gives some tips about logging as part of the exception handling which is something that every large application should do. I also will discuss some basic information about tracing which is another useful technique that is part of the .Net runtime.
The summary of this chapter will be: the exception handling in X# is nearly identical to how it's done in C#. And of course, the VO commands Begin Sequence, Recover, and End Sequence are available too with the VO dialect.
Some developers think that exception handling slows down the execution. This is something I have not experienced and it depends on the application type, the amount of logging, the environment (like logging to a file on a file share), and the weight of the benefits of exception handling. Nevertheless, it's almost mandatory for any large application that logs itself and the amount of logging can be controlled through a config file.
The nature of an exception
Every exception that is thrown during the execution of a program is based on a class that inherits from System.Exception. It's possible to define custom exception classes, although I have never done this in a project. The exception base class defines members like Message and StackTrace that every other exception class inherits.
| Member | Meaning |
|---|---|
| Data | Some internal data that is provided by the specific exception class. Usually null. |
| HResult | The error code for exceptions that arise from a COM exception. |
| InnerException | Another exception that is encapsulated by the current exception (most of the time null). |
| Message | Most of the time an error message. |
| Source | The source of the exception. |
| Stacktrace | Text data that provides more information, like the line number, of the origin of the exception. |
Tab 10.1: Common properties of the exception class
What to catch - Exception or SystemException?
Some developers catch exceptions of the Exception class itself, others catch SystemException. Any differences? The answer is, as usual, it depends. It depends on the method that caused the exception. For the regular classes of the .Net runtime, the exception class inherits from SystemException most of the time. But that's not always the case. Some classes in the System.Net namespace like HttpClient will throw exceptions that inherit directly from the Exception class. This exception won't be caught by a catch command for SystemException. Wouldn't it be the best solution to always catch only the Exception class so that every exception class is caught as well with a single catch command? Again, it depends. Usually, it's not feasible to catch all kinds of exceptions with the same catch command because not all exceptions should be handled the same way. From my experience, > 90% of all exceptions derive from SystemException with a few exceptions (pun intended ;). And in large projects, there was never the need to handle more than two different exceptions.
NOTE: For X# specific exceptions, like converting a Numeric overflow when converting USUAL of type 'DECIMAL' to 'DWORD' the exception class must be caught because a XSharp.Error cannot be caught as a SystemException.
Fig. 1 shows a few classes of the .Net exception class hierarchy. There is a total of > 400 of these classes in the .Net Framework, and most of them are special. Because every exception class inherits from System.Exception, every exception class offers the same properties like Message and InnerException. Each exception class might add additional properties that provide more information about the specific error like a StatusCode property.
TIP: To find out what exceptions you might expect when calling a specific method, you will find this information in the official documentation for that method.
 Fig 10.1: A section of the .Net Exception class hierarchy
Exceptions in the X# runtime
When the X# runtime throws an exception, there is an additional XSharp.Error object involved that has extra properties like Description, Arg, or Operation compared to the System.Exception class.
The following examples use the familiar Begin Sequence/End Sequence error handling that has been extended by a Finally part too. Not necessary to mention that it's not available in the Core dialect.
**Example 10.1: (XS_RTErrorSequence.prg) **
// Using the extended error object from the X# Runtime witb Begin/End Sequence
// Compile with /dialect:VO /r:runtimeLibs/XSharp.Rt.dll /r:runtimeLibs/XSharp.Core.dll

Function Start() As Void
  Local oErr
  Begin Sequence
    // generate an error
    var numText := "12345678901234567890"
    ? AbsInt(Val(numText))
  Recover Using oErr
    ? "An error ocurred, sorry"
    ? oErr Is Error
    ? i"Description={((Error)oErr).Description}"
    ? i"ArgNum={((Error)oErr).ArgNum}"
    ? i"Operation={((Error)oErr).Operation}"
    ? i"StackTrace={((Error)oErr).StackTrace}"
  Finally
    ? "And finally..."

  End Sequence
Exceptions and how they look like
Exception handling is necessary when an exception should not crash the application. Such a crash is informative and maybe even interesting for the developers when it happens within Visual Studio (Fig 1), but it's annoying or terrifying (or both) when it happens outside Visual Studio to an inexperienced user.
Example 10.2: (XS_QuoteProjectV1) ** You will find the source code in the repository
Have a look at a small WinForms sample application XS_QuoteProjectV1. Depending on the state of the checkbox it displays either a quote from a famous TV show from the 60s or it produces an exception that is not handled.
 Fig 10.2: An unhandled exception happens inside Visual Studio
If an unhandled exception occurs outside Visual Studio, there is a chance to continue the application. But usually, this is not an option.
 Fig 10.3: An unhandled exception outside Visual Studio (not so nice)
If an exception is handled, the developer can make several choices like showing a message box or not, logging the error, or terminating the application in a controlled way.
 Fig 10.4: An App with exception handling does not crash
Exception handling with try and catch
C# and Visual Basic developers will find the try/catch/finally commands of X# very familiar. One little difference between C# and X# is the fact that the exception variable is declared X# style.
The general structure of a single exception-handling block is
Try
// some commands
Catch ex as SystemException
// some commands
Catch ex as SpecialException1
// some commands
Catch ex as SpecialException2
// some commands
Finally
// some commands
End Try
It's important to note that exception handling is only possible within a method (or function). And a try-block can contain another try/catch block and so on. There is no application-level exception handling (although it would be possible to set up an event handler for all uncatched exceptions).
The following example produces an IndexOutOfRangeException when it's called multiple times. The catch block just prints the type of the exception, the error message, and the so-called "stack trace" which contains additional information like the name of the methods that have been called before the exception occurred.
Example 10.3: (XS_TryCatch.prg) ** You will find the source code in the repository
When compiled without debug information the stack trace just contains the name of the function that throws the exception.
 Fig 10.5: An exception handling message without debug information
To get more information like the line number where the exception occurred, the debug information is needed. The compiler generates the debug information by using either the /debug+ or the /debug:full switch. In both cases, a PDB file with extra debug information is generated. The stack trace now contains the line number too. In Visual Studio, this is set by using the Debug configuration.
 Fig 10.6: An exception handling message with some debug information
At the risk of saying something that is obvious or could sound like I have added a pinch of irony if another exception occurs inside a catch or a finally block this exception is not handled by the outer try/catch. It would need its own try/catch block. Although this is possible of course, it's better to avoid this kind of situation and keep each block simple.
The final statement
As in C# and other languages like Java the optional finally block is always (!) executed. Even when a catch block contains a return or exit statement. The idea is to have a "cleanup service" that closes open database connections if necessary. But I am using finally only on a few occasions.
Both in any catch but also in the finally block other exceptions can occur which are not handled by the outer try/catch.
Getting the method name and other information
There is an official and simple technique within the .Net Framework to get not only the name of the calling method but also the filename of the file that contains the method definition and the line number. The technique is based on three attributes from the namespace System.Runtime.CompilerServices. One of the attributes is [CallerMemberName]. To extend a method so that the name of the calling method is available inside the method definition, the method needs another parameter that is preceded by the [CallerMemberName] attribute. The name of that parameter doesn't matter, but its have to have a default value.
using System.Runtime.CompilerServices

Internal Method Delete([CallerMemberName]methodName := "" As String) As Void
   ? i"Calling from {methodName}"
   Self:pListe:RemoveAt(0)
Exception handling with Begin/End Sequence
The good, old error handling with Begin Sequence and End Sequence is available too in any dialect except Core.
It might appear a lead old-fashioned for any C# or even Visual Basic developer, but it might lead to a better readability compared with try/catch.
Ex
Handling different types of exceptions
If a method can raise different kinds of exceptions, either all exceptions are handled by the Exception or SystemException class or by the specific exception class. In case of a divide by zero exception, this would be the DivideByZeroException" class in the System namespace.
Try
  var i := 0
  var z := i / i
  ? z
Catch ex As DivideByZeroException
  ? i"Error: {ex}"
End Try
````
**Example 10.4: (XS_TryCatchWithClass1.prg) **
*You will find the source code in the repository*

What happens if a different kind of exception occurs? This will be handled with no exception handling. The app will crash. To avoid this situation, a method either contains multiple _catch_ commands or a catch branch for the most general exception that either handles all other exceptions or "throws" them to the calling method with the _throw_ command (like in C#).

**Example 10.5: (XS_TryCatchWithClass2.prg) **
*You will find the source code in the repository*

Two details are notable in this simple scenario:

1. The order of the _catch_ commands is important - the most general exception has to be caught at last (otherwise the compiler gives an error).
2. When compiling for the core dialect, any member of the exception class has to be accessed with the dot and not the colon.

### Handling multiple exception types with the same catch

C# introduced exception filters with version 6.0. A filter consists of the keyword *when* followed by one or more type comparisons. Thanks to the amazing X# developer team, the same syntax can be applied in X# too.
Catch ex As SystemException when ex is ArgumentOutOfRangeException || ex is ArgumentException ? "I have just handled an ArgumentOutOfRangeException!" Catch ex As SystemException when ex is DivideByZeroException ? "I have just handled a DivideByZeroException" Catch ex As SystemException ? i"I have just handled a {ex.GetType().Name} exception!" End Try
As usual, the most general exception type has to be handled at last.
**Example 10.6: (XS_ExceptionsFilter.prg) **
*You will find the source code in the repository*
There are more options with a recent version of C# like pattern matching that was introduced with C# 9.0. These features have not been implemented in X# so far.
---
**_TIP_**: It is time for the mention of another lengthy discussion on Stackoverflow that contains all you ever need and want to know about how to handle multiple exception types within the same *catch'* branch (in C# of course): https://stackoverflow.com/questions/136035/catch-multiple-exceptions-at-once
---
## Handling exceptions in a class library - the throw command
Methods in a class library should not handle exceptions with their own logic. Instead is better in most cases to return the exception to the calling program so that the calling party can handle the exception its way. This is done by the *throw* command.
This command throws an exception which means that a new exception is raised. The raised exception can be used as another argument in the constructor of the new exception. The raised exception becomes the "inner exception" of the new exception.
Ex {{*XS_ExceptionProjectV2:Proj}}
Have a look at the sample project *XS_ExceptionProjectV2*. I have refactored the commands for initializing the quotes and getting a quote into a class library. Each of the methods uses a *try/catch* and throws the caught exception to the calling program with *throw*.
## Making a handled exception break in Visual Studio
Exception handling makes debugging a little harder because Visual Studio will not automatically switch into the debug mode when an exception occurs. But it's possible of course to change that behavior:
1. Open the Debug menu and choose Windows -> Exception Settings.
2. Search for the exception type or select it from the tree view, for example, *ArgumentOutOfRangeException*.
3. Select the checkbox (this became much easier with recent versions of Visual Studio)

*Fig 10.7: Setting an exception so that Visual Studio will break even if it's handled*
Now, Visual Studio will break at the moment the exception occurs and switch into debug mode even inside a *try/catch*.
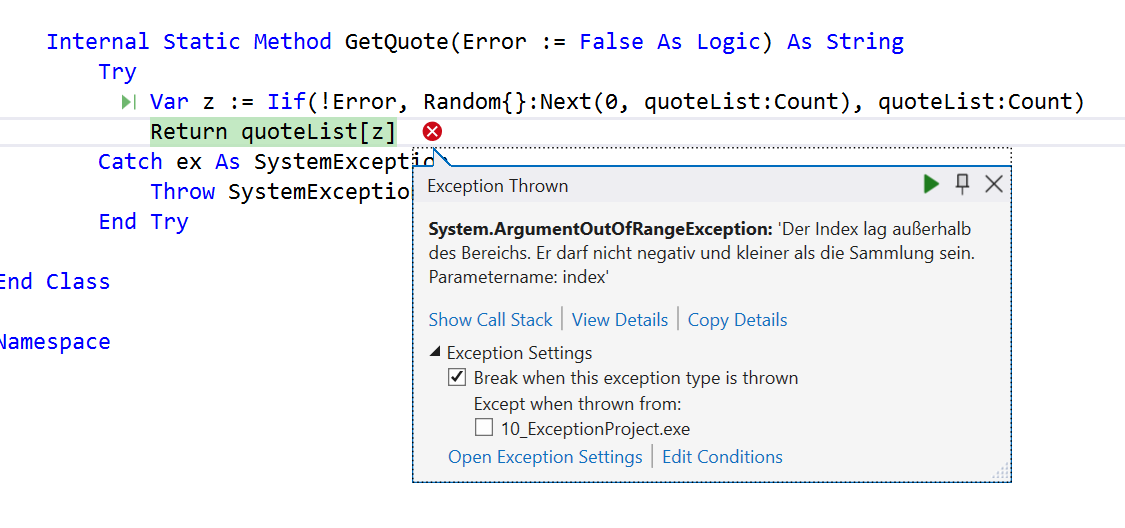
*Fig 10.8: Visual Studio breaks when the exception occurs although there is a try/catch block*
## Asserts as an alternative
Exception handling should not be used too much for catching errors that should be fixed. The common technique is to include "asserts" before critical sections of the program code that test critical conditions that must be True for the code to function correctly. These tests are called assertions and are done with the *Assert* method of the *Debug* class. The general technique of "asserting" conditions at runtime is very old and was also part of VO.
The following example is very simple.
var condition := GetCondition() Debug.Assert(condition, "The condition must always be True")
First, a function is called that returns a value that has to be True. But since the developer is not sure if this is always the case, he or she puts an Assert() after the value is returned. If the value is not True, the program execution stops and a dialog box pops up with three options:
1. Cancel
2. Try again
3. Ignore
The obvious choice would be to cancel the program and fix the code so that the assert condition is always True.
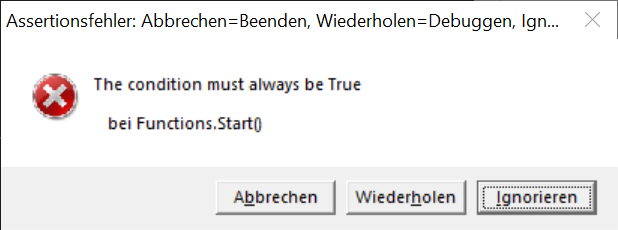
*Fig 10.9: A typical assert message box*
Asserts are only part of the debug configuration of an application. If the application is built with the release configuration, all assets are not compiled and therefore not part of the application.
To achieve the same effect for a console application that is directly compiled, the *DEBUG* constant has to be defined through the */d* switch.
```C#
xsc .\XS_Asserts.prg /D:DEBUG
Asserts are very useful. Using Asserts extensively is recommended by advocates of the "defensive programming" style. The book Code Complete by Steve McConnell explains this concept in great detail. Although the second (and last) edition of this book is from 2004, it's still worth reading.
Example 10.7: (XS_Asserts.prg) ** You will find the source code in the repository
Writing debug and trace messages
Writing messages to either the console or the output window was, is, and probably will be a popular debugging technique in the foreseeable future. But instead of using ? Console.WriteLine you should use the WriteLine() method of either the Debug or the Trace class in the System.Diagnostics namespace. Why? Because there is a whole "logging infrastructure" behind these simple methods.
TIP: Thanks to modern terminal windows, the output can contain different colors in a single text by using VT 100 esc sequences.
Each WriteLine will write the message to all so-called listeners that had been configured for the application. From the start there is a DefaultTraceListener that outputs a message to the output window (which does not exist outside Visual Studio). You can add more listeners each through code or the config file for the application.
Example 10.8: (XS_ShowListeners.prg) ** You will find the source code in the repository
The following config file XS_ShowListeners.exe.config adds another listener that will output to the console (and removes the default listener although that's not necessary).
<configuration>
  <system.diagnostics>
   <trace indentsize="4">
    <listeners>
     <remove name="Default" />
     <add name="Listener1" type="System.Diagnostics.ConsoleTraceListener" />
    </listeners>
   </trace>
  </system.diagnostics>
</configuration>
But although the config file is ok, the following call will not print anything to the console window:
Debug.WriteLine("*** This is a debug message ***")
The reason is, that is the nature of debug messages that are only compiled when the DEBUG constant is defined, for example through the /d switch like so:
xsc .\XS_ShowListeners.prg /d:DEBUG
Now the message will (hopefully) appear in the console window.
Defining a trace switch
A trace switch allows any kind of command will only be compiled when a certain condition is true. The flexible part is, that the condition can be defined in the config file.
The following config file defines a trace switch of type BooleanSwitch with the name "XSwitch" and a value of 1 which means the switch is on:
<configuration>
  <system.diagnostics>
    <switches>
      <add name="XSwitch" value="1"/>
    </switches>
  </system.diagnostics>
</configuration>
The following message will be printed:
Local boolSwitch := BooleanSwitch{"XSwitch", ""} As BooleanSwitch
If boolSwitch:Enabled
   Console.WriteLine(i"*** A special trace message at {DateTime.Now.ToString(""t"")} ***")
EndIf
If value is set to 0, the message will not be printed. Of course, there is no need to recompile the source code.
Example 10.9: (XS_TraceSwitch.prg) ** You will find the source code in the repository
Trace switch with a level
A trace message can be of any of four levels:
-
Trace = 0
-
Error = 1
- Warning = 2
- Info = 3
- Verbose = 4
By setting the level in the config file. it's possible to control when messages of a certain type are written. If you like to have only error messages printed but no warnings, info, or verbose messages, the value of the switch has to be 1.
The following config file defines a switch with the name "switch1" and a value of 2. That means, no info or verbose messages.
<configuration>
  <system.diagnostics>
  <trace indentsize="4">
      <listeners>
        <add name="ConsoleListener" type="System.Diagnostics.ConsoleTraceListener" />
        <remove name="Default" />
      </listeners>
  </trace>
   <switches>
      <add name="Switch1" value="2" />
   </switches>
  </system.diagnostics>
</configuration>
The TraceInfo property of the trace switch queries if the condition is fulfilled:
var switch1 := TraceSwitch{"Switch1", ""}
If switch1:TraceInfo
   Console.WriteLine("*** A info level message ***")
EndIf
Example 10.10: (XS_TraceSwitchLevel.prg) ** You will find the source code in the repository
One question has not been answered yet. What is is difference between the Debug and the Trace class? Although there are many similarities, there are at least two important differences:
- Debug.WriteLine() outputs only a message when the DEBUG variable is defined.
- Tracing offers more options.
The most important distinction is about the usage. Whereas the debug class is only for writing more or less simple messages during the execution of an application when compiled with the debug configuration, tracing is about "instrumenting" the running application with much more details.
The whole topic is covered in detail in the .Net documentation with many examples.
Logging exceptions with a logging framework
Logging is important, no doubt about it. But the question may arise if it's worth the effort. I can only recommend using logging extensively because it's the only way to follow the execution of the application without any disturbances.
The simplest logging technique is always to write something directly into a file by using simple classes like File or StreamWriter in the System.IO namespace. But even for small applications I recommend using a logging framework that offers more flexibility if needed than can be usually configured through an external config file. Each log message will contain a timestamp or other information that is part of the configuration.
Although the .Net runtime provides all the classes and methods for flexible logging, for my projects I prefer an external library. Although there are several great logging frameworks available, my personal choice has been Nlog for many years. Nlog is flexible, simple to use, and still under active development. The latest version is v.5.1.2 which supports .Net Framework and .Net 6 (the current .Net 7 version at the time of this writing was not mentioned on the project website yet).
You find all the information on the project website: https://nlog-project.org/
But again, other logging frameworks might be even a little better than Nlog but I have used it for many, many years and had never a reason to complain.
Using a package manager instead of direct references
.Net developer was used to including references in their project for assembly DLLs for many, many years. The DLL files are either part of the GAC (Global Assembly Cache) or are placed in a directory. By setting a reference, the DLL file becomes part of the project file and will be copied into the output directory during each build.
Then someone at Microsoft invented the NugGet package manager. A NuGet package in its simplest incarnation is just a zip file with a nupkg extension that contains the DLL file in a folder structure and some metadata about that DLL. Setting a reference to a package offers some advantages:
- The package becomes part of the project
- If there is a new version of a package, the package can be updated inside Visual Studio
Nuget packages can be included in an X# .Net Framework package too by right-clicking the solution name in the solution explorer and choosing Manage Nuget packages. This opens a dialog box where all the installed packages are listed and new packages can be installed in the browse section.
 Fig 10.10: Manage Nuget Packages in the Solution Explorer
And where do these packages come from? From a package source. And from which source specifically? Good question, the package sources that had already been configured can be viewed in the Visual Studio options by choosing Tools -> Options -> Nuget Package Manager -> Package Sources. The main package source is always nuget.org but other sources might have already been configured too.
And does Microsoft offer all these packages? Of course not. Microsoft offers only packages for their components, all the other packages come mostly from the developers or individuals who have decided to main this package.
 Fig 10.11: Most packages come from the nuget.org package source
But back to the Nlog framework. Although it would be no problem to just include a reference to Nlog.dll, using the Nuget package manager is a much better option, and the warranty for always using the latest and the appropriate version.
 Fig 10.12: The Nlog package is part of the project and a reference to the Nlog.dll set